Tuesday, September 17, 2013

Graham Cracker Crust Substitute


This blog isn't so much about the finished product, which turned out to be amazing key lime bars. It is more about the discovery to think outside the graham cracker crust.

I LOVE key lime pie. It is my absolute favorite. I wanted to make a key lime pie (with fresh key limes) that would take me back to the pies I have gotten in Florida.

I look in the pantry and see a box of graham crackers. Good, so now I just need the ingredients for the pie.
I bought my key limes, the cream cheese, and the sweetened condensed milk.

I get home super excited to make this pie. Take out the box of graham crackers and it has two little squares. Can you say UGH!!!!! I am sure most can relate. I start digging around what can I make a crust out of? Thought about just a basic pie crust. Nah not the same. I come across a box a girl scout cookies not the thin mints or caramel delights, but shortbread cookies. Tada instant light bulb. I take a sleeve and 1/2 crumbled it up and put in the food processor till it is almost fine.


 After that I added 3 tbls of brown sugar and 4 tbls of melted butter.

Since this was an experiment and I didn't know how this was going to work out I decided to make bars instead of a pie. I mixed the three ingredients together and pressed into my square baking dish. I then baked this experimental crust for about 20 minutes at 325.

I am a genius or at least that is what I shouted. The crust was a success. I do not have a picture of the final bars, but this crust is soooo much better than a graham cracker. I am all ready thinking of other ways to improve like maybe chop up some macadamia nuts or what other kind of cookie crust can I make. Maybe I am sheltered and this was a known idea, but I truly amazed myself.

Hope this gives you some ideas and have fun!!!!!!

Dresser Re-do

It has been a few months since I posted anything on my blog. I have been so busy vacations, back to school, oh and of course work. Right now we are in full cheerleader mode since it is football season here in Texas.

I just have to add the vacation photo from my first morning in Biloxi. This was back in July, but I truly love this place, I am thinking next year I need to stay a month vs. just a week. It was a glorious cup of coffee and not a bad view.

Anyway back to my latest project. It was time to upgrade Abigail's furniture she has been using the same dresser she was born. The rails had fallen off of one drawer and the bottom out of the other. Good news is that I only needed the top drawer intact. I once upon a time painted this dresser white and Abigail discovered she could carve her name and draw pictures in the paint.
 

I wanted an entry table that had storage, so I placed this worn, used thing next to the front door to see if having it there would start to bug me. Needless to say the only thing that bugged me was the way it looked.

Yeah!!!! Project time. This dresser is going to be a stylish entry way table with storage to boot. I hit the ground running spending the better part of a Saturday sanding, sanding, and more sanding. I am so glad it was an electric sander.
 
After about 6 hours this is all I had accomplished. On Sunday morning I got up and started sanding again. This time I finished the drawer face and the door. It only took me about 4 hours to finish all the sanding work. Now the fun part. Painting!!!!!!


I went with a dark brown on the outside. The interior color was suppose to be a green gray and looked that way on the paint card, but when painted it just looked gray. I still like the way it turned out.

 Finishing touches. I painted the drawer and the door the same brown. I reattached the railings for just the top drawer. I bought new knobs, and I added a border around the bottom. Almost forgot I did add a sealer to the piece, just so the paint wouldn't scratch off when I put things on it. After all was said and done I spent about $60.00 to transform the original dresser. The biggest expense was more sanding pads. The end product looks great and I discovered I need to go shopping for some great accessories.


The cigar box belonged to my husbands grandfather. A nice catcher for keys.

I hope this gives you some ideas and have fun!!!!!!!

Saturday, July 6, 2013

DIY Kids Mud Room Bench

 Continuing on with my bench craze.


Okay, so I found this little beauty at a garage sale for $1.50. Not so pretty you say. Well a little paint and a little love and you will be surprised.


My children constantly walk in and throw their backpacks and shoes right in front of the front door. My solution is we need some sort of storage or mud room.

Well since an actual mud room is out of the question storage it is.

I hung that pretty rack right above this soon to be pretty storage solution. Perfect height for the children.

I took these shelves and spray painted them brown. Then I took some padding. Hobby lobby has them for $4 each. Don't forget the 40% off coupon. I bought 2 and cut to size. Next I took some left over fabric and glued it to the padding. Yes, this is left over material from the fabric bin. After that I glued the padding that was all ready attached to the fabric to the top of the shelf.


Perfect for those little shoes that can't find their way.


With the hooks above. Now they put their shoes up.
Total cost was about $13.50 and that included a bottle of brown spray paint. The material was scrap, so I did not include in my total.

Hope this gives you an idea and have fun!!!!

Coffee Table Bench


Here is another DIY I did back before I had the Blog. There are not any pictures on how to do it just the before and after.

I wanted one of those padded benches for the bedroom, but again the cost. I just couldn't spend $100's of dollars on one.

I scoured the Goodwill's and flea markets even Craig's list looking for the perfect coffee table. I was only willing to spend $20. You guessed it no such luck. A friend of mine had one sitting in her garage that she had empty pots sitting on. I asked if I could have it. I was told she had this coffee table since your oldest boy was 7. I am guessing the table is about 25 years old. Well she gave it to me. Even with crayola marks on the underneath.

Here are before pictures. Again please ignore background messes. Didn't know I would be posting for the world one day.


So, how did I transform this coffee table with the split wood down on side. Easy Peasy.

If you flipped the table upside down you can see where the screws are that hold this entire thing together. Unscrew them and take the top off. My husband then took the frame to the garage. He added some wood glue where the split was and placed a vice on it to hold it together. Left it like that for a day.

I then went to Hobby Lobby. Well now I know why those benches are so expensive the padding was not cheap. I opted for the 1 1/2 inch thick. It comes in a big roll and the cost was about $40. Don't forget the 40% off coupon. Then I started looking for the fabric. I believe I bought a yard. Your fabric size will vary by the size of the table and the thickness of the padding. Now to put this sucker together.

I took the table top and laid it face down on top of the unrolled padding. I then took an exacto knife and started cutting around the table. When that was finished I flipped the table top back over and glued the padding to it. I placed a heavy board on top of it just to hold the padding in place. It wanted to roll back up on me. While that was sitting I measured for my fabric and cut the amount needed.

This next part took two of us. Only because I didn't want a lesson on how to use the air staple gun. Flip the table top over face down on the center of your fabric. The padding should be well stuck after 15 - 30 minutes. We started on the end right in the center. Pull the fabric tightly around and staple in place. There was a little over hang from the padding but when pulled tightly gives the edges that round look. Just keep pulling and stapling. After we got the ends done. We did the sides. I kept looking underneath to make sure there was no wrinkles and that the fabric was pulled tight. Finally we stood it up on one end while he stapled the material to the underneath.

When finished stapling husband took it the garage and reattached the top to the leg frames. Afterwards I used wood oil and gave the legs a pretty shine.  I am still on the look out for another table especially one that has a really pretty ornate siding, but I am happy with my 1st DIY bench. This is the same side that was split in the before picture.


Not bad huh. Since the table was a freebie my only cost was the padding and the material. Total was about $35.


Friday, July 5, 2013

DIY Fabric Bin


Here is another blast from the past. I love those big tote bins that are fabric covered. I just hate paying for them $20 - $30 for one.

Well I decided to make my own from one of the many empty boxes we always seem to accumulate. Believe it or not this time it wasn't a diaper box.

I took a good sized sturdy box and cut the flaps off. I wasn't to worried about the scraggly pieces because I was going to cover them up. I found a nice striped fabric that I liked and a solid color that matched. I got a yard of the striped and 1/2 yard of the solid. Depending on the size of your box will determine how much fabric you need.


I placed the box in the center of my fabric. Fabric goes pattern side down. I placed the solid color inside the box and started gluing it to the bottoms and the sides. I didn't go all the way up since I was going to bring the striped material down. After the solid was in place I draped the striped over the side. I started gluing it down. I then cut off the excess. I folded where I cut under and glued that down just so I couldn't see my uneven line.


I like the way it looked and currently it is being put to good use storing toys in the playroom.

Have fun..

Apple Walnut dipped in Caramel Cookies


Here is a sweet treat I did a while back. What I don't get is I HATE baked Apples or even just Apples, but I sure do make a lot of stuff with them. Good thing is it keeps me from eating them. According to the family these were addicting.

I only took the one picture, but here is the recipe.

  • Here you go. Don't freak out it seems like a lot, but it only took me about an hour and that included cleaning up the mess.
    Filling
    1/3 cup chopped unpeeled apples
    1/3 cup evaporated milk
    1/3 cup sugar
    1/3 cup chopped walnuts (or whatever you like)

    Put that in a saucepan and cook and stir. It will start to thickening up.
    While this is cooking I started making the dough


    Dough:
    1/2 cup butter (softened)
    1/4 cup powdered sugar
    1/4 cup brown sugar
    1 egg
    1 tsp vanilla (I didn't measure it but it looked to be about that much)
    1/4 tsp salt (I didn't measure it but it looked to be about that much)
    2 cups flour
    Mix the sugars and butter first. It will get fluffy. Don't forget to stir the filling.

    Beat in the egg and vanilla. Then combine the flour and salt. I added the flour slowly to make sure I got it mixed.
    The filling should be done now. Remove from heat and let it cool.
    Take the dough and start rolling balls I did mine at about 2 inches or so. Once rolled the filling should be cooled off.
    To fill the cookies flatten out the ball and place some of the filling in the middle then fold the dough over and reshape into the ball. Place on a cookie sheet and bake at 350 for 12-15 min. I actually baked mine for 15 min.
    I cleaned up that mess while the cookies were baking.
    After the cookies are done I started on the caramel while they cooled.
    Caramel Dip
    14 oz package of caramels.
    2/3 cup evaporated milk
    Heat over low heat until melted. Then dip your cookies and place on a wire rack so excess drips off.
    Enjoy....

DIY Dog Food Can


I haven't posted anything in awhile. Been busy with work and getting ready for one of the Lil Laroux's to turn  the big 3. I decided to post a DIY project I did back before I had the blog.

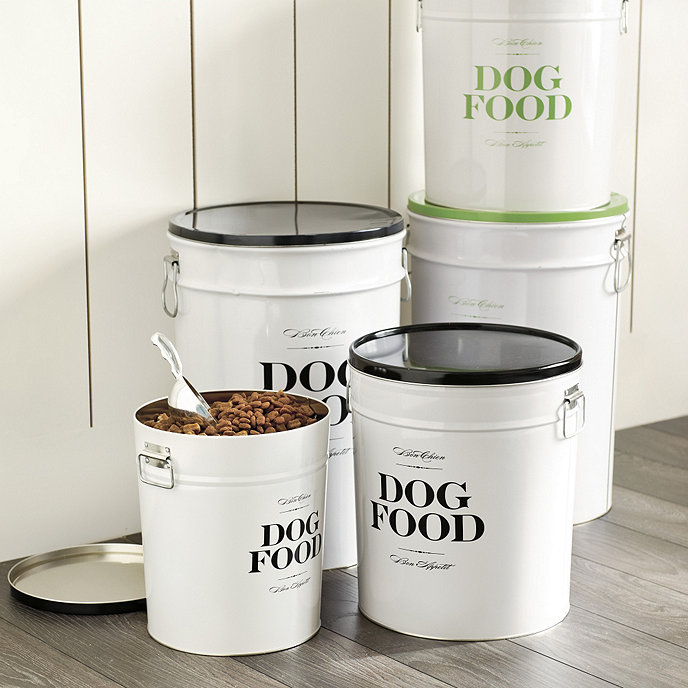
We have all seen these expensive fancy dog food cans. $54.00 ouch.
Bon Chien Food Canisters

Here is how I did mine for the price of a popcorn tin and a few odds and ends. Total was about $10.00.

It is Christmas time, all the family is around munching on the 3 different flavored popcorn. What to do with that popcorn tin? My Mom supplied this one for me to play with.


Granted my stenciling work isn't that pretty, but all I need is more practice and worse case I could buy some of the self adhesive letters from the scrap book section.

I spray painted the lid and the tin a manly dark blue. I found a paw print stamp at Hobby Lobby for $2.00. Don't forget the 40% off coupon. They also had this cute ribbon which I glued around the rim of the lid. I always have paint here at the house. I have a shelf in the garage that looks like the paint section at Lowe's.

I took the letter stencil and wrote dog food on one side. Again the stenciling needs work, but I was happy with my first go at it.


My finished version. Hope it gives you some ideas and have fun.

Tuesday, June 25, 2013

Stylish Jars


This is one of the earlier projects I did. I did not take a lot of pictures in the making of these jars. I did go a little jar crazy. Dumping pickles and olives in a Tupperware just so I could I use the jar. Calling on friends and family to give me their jars. I ended up with 5 total that I actually used.

I see on Pinterest blogs making these jars using old toys. I might have to try that for the kids.

Here was my first go. A peanut butter and jelly jar. Yes, my purse is in the photo didn't know I would have a blog someday. I might have rushed right out to buy a knob from Lowe's and was just so excited snapped a photo.


I let the jar soak in hot sudsy water to help remove the label and sticky glue. Next I spray painted the lid. I chose oil rubbed bronze since that is what we are redoing our bathroom in.

I used a primer and then spray paint on the first lid, but it turned out very bumpy. For the rest I just spray painted and skipped the primer. The result was much better as the lids were very smooth.

I went to Lowe's and picked out an inexpensive cabinet knob I think the cost was $1.99 for each of the knobs. I had my husband put the knob on since he had to trim down the screw. I don't know what he used or how he did it, but the end product looks great in my bathroom.


Hope it gives you an idea. Enjoy and have fun.

Thursday, June 20, 2013

Elmo Birthday Party


This party is what started me on my baking adventure and getting me into the DIY crafty things. This was Hailey's 2nd birthday and I started seeing all the different cake pops out there. I thought why can't I do that, so I gave it a go.

The cake pops were not as easy as they looked. I started off on bakerella's web site and used her basic cake pop recipe. Which was any flavor boxed cake mix you wanted.  It took quite a few attempts to make what I thought was a simple Elmo cake pop.

Elmo beheaded.

After several attempts. Tada success.


I even got my husband into the madness. Make me a sesame street sign. He finished it the morning of the party.


All things Elmo. The fruit tray which is just strawberries, blueberries, oranges, and cream cheese dip. I also added mason jars with the goldfish crackers in them.


The cake. My sister n law is a trained pastry chef and the cake is her doing. 


Everything turned out great. From the DIY pom poms to the trashcan punch. My tribute to Oscar the grouch. Basically Hi-C with slices of oranges and limes in it.

Hope it gives you some ideas.

Key Lime Sea Turtle Cupcakes


I saw the cutest cupcakes on the allthingscupcakes web site. For some reason when I saw the Sea Turtles I automatically thought Key Lime Pie. Well me and the Lil' LaRoux's decided to give it a go. Husband made a rare appearance.


For the cupcakes:
1 1/2 cups flour sifted
1 tsp baking powder
1/4 tsp salt
1/2 cup milk
1 tsp vanilla ( I always add a little more) Love the way it smells.
2 tbsp Key Lime juice I found it in the juice aisle.
1 tbsp key lime zest
1/2 cup butter (1 stick) room temp
1 cup sugar
1 lg egg
2 egg whites

For the frosting
1 cup (2 sticks) butter (firm)
pinch of salt
3 1/2 cups confectioners' sugar
1/2 tsp vanilla (again I added a smidgen more)
1 tsp key lime juice
1 tbsp key lime zest

For the turtles:
Peach Gummy Rings
Gum Drops
Fruit Slice Wedges
Mini Choco Chips

Pre - heat oven to 350. I used cupcake liners with these cupcakes I sprayed the liners with Pam for baking just so they wouldn't stick.

In a bowl whisk together flour, baking powder, and salt. Set aside In a small bowl mix the milk, vanilla, key lime juice and zest. Set it aside.

With the electric mixer using the paddle I creamed the butter and sugar till light and fluffy. Gradually add the sugar until mixed and fluffy. Reduce your speed on the mixer and add the egg and egg whites until blended.

Keep the mixer speed on low or you will have a dust cloud. Slowly add half the flour mixture that you set aside earlier. Once blended add the milk mixture that was also set aside. Once blended you can add the remaining flour mixture. I had to stop the mixer and scrap down the sides a few times to make sure it was well blended.

Spoon into your lined muffin pan and place in the oven. Cupcakes are done when the toothpick inserted into the middle comes out clean. Let the cupcakes cool completely before frosting and decorating.

To make the frosting:
Beat together butter and salt until fluffy. Slowly add in the confectioner's sugar again turn the mixer to slow or you will get covered in dust. When combined add the vanilla, key lime juice and zest.

You can adjust the key lime juice in the cake batter and frosting to suite your taste.

This is where I clean up the mess and bath the girls. They are usually covered in something sticky after helping me.


Now to decorate.

Frost the cupcakes once they are cooled. I layered it on pretty thick, so my candies would really stick. I placed the peach gummy ring in the center of the cupcake. The girls then added the gum drop in the center of the ring and the green gum drop for the head. To make the flippers I took the fruit wedges and sliced them , so they kept their shape but were a lot thinner. Should have taken a picture of that part. Next the eyes. I added some of the frosting into a sandwich bag and snipped a lit piece of the corner off. Then I just put a dot on each side of the gum drop and placed a mini choco chip in it.

I think the cupcakes turned out rather well and the girls were very proud of their work.

Have fun and enjoy!!!!

Friday, June 7, 2013

Cupcake Topper Whoopie Pies


To make the filling you need the following:
1/2 cup butter softened (1 stick)
1 - 8oz package cream cheese
1 - 1LB box of powdered sugar - or 2 cups.
1 tsp vanilla

Mix the softened butter, cream cheese, and vanilla.


After it is mixed I added the powdered sugar. Slowly a little at a time. I stopped a couple of times to scrap the sides and the bottom of the mixing bowl.

I added a little bit of blue coloring, since that is now Abigail's new favorite color.

I then spooned the mixture into a sandwich bag and snipped a corner off. I have to say that the tops were very sticky, so I dusted the foil with powdered sugar.

I then piped the filling on one side and found a matching size to sandwich. I have to admit these were not very pretty. After I completed I placed in the fridge for a while. We went to dinner, so at least 2 hours. 
When I came back I took them out and re-dusted with powdered sugar. Still don't think they are very pretty, but they are tasty. I dusted them using a flour sifter, but a shaker would work too.

Enjoy and have fun.

Graduation Cupcakes


This is my second batch of these cupcakes. One was for my younger sister's High School Graduation party and the other was for Abigail's 1st grade graduation.


It is my hot mamma cake recipe minus the cayenne pepper. Then some store bought goodies for affect.
Grease a mini muffin pan and pre-heat oven to 375. Do not use cupcake liners.

2 Cups water
1 cup Cocoa powder

Place 2 cups water in a pot and right before it starts to boil I add the 1 cup cocoa powder. I make sure the cocoa powder is dissolving by mashing the clumps up against the side of the pot. Bring to a boil and set aside.


While I am boiling the cocoa I start creaming the sugar.

1 cup butter (2 sticks)
2 1/4 cup sugar

Place 2 sticks of room temp butter and the sugar in a large mixing bowl. I put the mixer on level 3 and let it do its thing. The butter and sugar will like this.


Leaving the mixer going I added the following.
4 eggs
2 tsp baking soda
1/2 tsp baking powder
1/2 tsp salt
1 1/2 tsp vanilla
2 3/4 cups flour

When the above is well mixed and creamy I add the cocoa mixture. I had to turn off the mixer a few times just to make sure the 2 mixed really well.

Then fill your greased mini muffin pan. This recipe will make at least 48 mini- muffins. Bake until a toothpick comes out clean. When finished baking set aside to cool. After the pans can be touched very gently remove the cupcakes from the pan. Hopefully they didn't stick.

Once the cupcakes have cooled completely. You will need to slice the tops off, so the cupcake will lay flat when turned upside down.


Now comes the fun part. DECORATING.
1 can chocolate frosting
large fudge graham cracker cookies (I bought 4 pkgs but whatever you need)
1 bag of spaghetti gummies
mini M&M's

For time sake I bought a can of chocolate frosting. Using a large spoon I frosted the top and put it on rather thick, since this is the glue that will hold the cookie on. Place one cookie on the top. After that I used the end of a chopstick and placed a mini m&m in the center. Then I added another little dollop and placed the spaghetti gummy in it.

Now what to do with all the tops I cut off. I know WHOOPIE PIES.

Enjoy and Have Fun.